We know the importance of reading and discerning fire behavior. Analyzing the structure and the way it is burning allows us to make competent decisions to put the fire out.
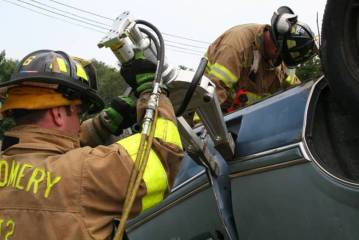
The same is true for performing vehicle-extrication operations. One of the most common mistakes involves misplacement of tools when trying to move metal.
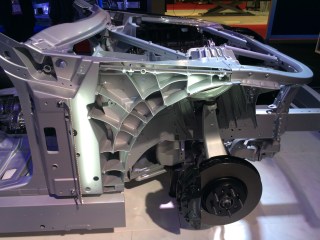
The first thing is to develop is an understanding of the anatomy and construction of today’s vehicles. This falls into two basic categories: body panels and structural elements.
Body panels are the vehicle’s skin. Generally, late-model passenger-vehicle body panels are thin and lightweight and provide minimal rigidity or resistance. Rigidity or resistance is greater where bends are present, particularly on fenders, quarter panels and deck lids.
These are somewhat reliable points to push against or establish capture points. The flatter body-panels surfaces are easily displaced and sheared unless they have significant reinforcement. Hoods, deck lids, and roofs will present a wide variety of reinforcement, but the only panel that may have substantial reinforcement is the roof.
These flat areas are unreliable push-and-capture points. If you have to use them as such, the reinforced areas should be identified so that you can focus your attention there. Here are two examples.
Case 1
You arrive on the scene of a SUV on its side. You want to stabilize the roof side with struts, but the roof does not provide a good capture point.
You can use simple hand tools to quickly shear the thin roof panel to make a pocket for the head of the strut, or if the strut has a piercing head, drive it into the panel.
It is important to position this capture point and the head of the strut as close as possible to the structural rail above the high-side window openings. If the strut head were placed in the middle of the roof panel and the vehicle shifted, the potential for the strut to shear the panel and become displaced is significantly increased.
Modern body panels are typically attached to inner construction or more structural elements with automotive adhesives and plastic retention pins or clips. Nuts and bolts are few and far between. This allows rescuers to easily peel and displace body panels.
However, this is often an undesirable outcome. Peeling body panels exposes inner construction but does not increase access to our objective. It also weakens the overall design of that vehicle component and makes the removal more difficult.
Case 2
When attempting to force a door by popping the Nader pin and door latch, you place the spreader tip on the edge of the door and quickly see separation between the outer layer of the door panel and the inner construction of the door assembly. This is commonly referred to as skinning or peeling.
If you continue to spread, the outer panel will separate but the Nader pin and door latch connection that you are attempting to pop will remain intact.
If you relocate your tips to the inner construction of the area you are trying to attack, the metal will displace rapidly and fold around the latch rather than popping. That is because you have weakened the overall resistance and rigidity of the door.
How they Present
Once you understand these fundamentals about body panels, you can apply some methodology to your tool placement and extrication techniques. When forcing doors, look at how they present and read them.
The weakest part of a door is the middle. Using vertical spreads in the window opening to create purchase points for hinge or latch access make the most sense. It makes sense because it attacks the weakest portion of the door and develops an outward extrusion in the door. This will take the energy and movement of a door pop away from the victims inside.
The next objective is to spread the latch assembly and or spread or cut the hinges. It is easy to develop tunnel vision toward the latch assemblies and hinges and attempt to gain access to these by spreading the door at their locations.
These are the strongest points of connection between the inner door construction and the vertical posts or pillars of the vehicle. This misapplication of tool placement often results in peeling or skinning because the initial tip placement occurs on the outer panel.
Attacking the Gap
If you assess the door presentation after the initial window spread, there is typically a purchase point or gap created between the window rails and the vertical posts of the vehicle. The window rails are a more structural steel that commonly runs down into the door assembly and is connected to the inner door construction.
Attack this gap and incrementally spread and relocate the tips. Work deeper towards the inner construction and progressively move down towards the latches or hinges. This maintains the integrity of the door and increases the likelihood of an effective displacement.
Once you have gained adequate access to the door’s inner construction around the latch assembly or hinges, spread it out and pop the connection or cut it.
Take a moment to look at the body panels. Evaluate the inherent weak points and use those as well as the overall design and presentation of the panel to your advantage. Let the tools do the work.
Structural Elements
The structural system is the skeleton and muscles of the vehicle, yet it does more than give it form. It has energy-absorption points known as crumple zones. These are segment breaks or weaker points in a structural member that allow it to withstand tremendous impacts and absorb or dissipate energy before it reaches the occupants.
We now have eye-popping collisions with tremendous vehicle damage with passengers that are entrapped but minimally injured based. The other facet to these engineering principles is that newer vehicles have incredibly rigid and strong structures around the passenger compartment.
This means high-strength steels that are difficult to cut or move. This translates to new tool requirements and a deeper understanding of what we can effectively cut and where we should cut.
By looking at the structure of a vehicle as a skeletal system, we can determine that isolated relief cuts are usually far less effective than multiple relief cuts. Rather than trying to remove an entire element, simply weaken the areas around that element and then move it. Here is an illustration.
Case 3
You have removed the side and roof of a vehicle in which the dash is impinging on a passenger. You prepare to lift the dash by making one relief cut in the A pillar between the dash and the rocker.
You then place your spreaders into the cut and attempt to lift, but the dash reaction is minimal and the A pillar that you are spreading starts to shear apart and displace in an undesirable way. If you continue to spread, you may start to shear the floor pan, separate the rocker and push the floor down.
This may get you what you need, but the travel is contained to the gap between the original position of the floor and the ground or cribbing. If you take the time to add a relief cut to the fender rail between the front wheel suspension hub and the firewall, you will free up the dash so it can freely displace with minimal resistance.
Fold the B Post
The weak points within the structural system are generally connections between members or the crumple zones. Understanding the structural system and its relationship with the body panels will pay dividends when extricating.
I apply this frequently with side-out techniques. Instead of always making two initial cuts on an intact B post, I often make a single high-side cut and fold the B post down by spreading the cut, or placing a ram between the roof rail and the door at the bottom of the window opening and pushing.
When folding a B post, the spot welds that attach the B post to the rocker usually breakdown and allow the entire side to be walked to the ground or sheared with greater ease.
If I am performing a rip and blitz or a side-out technique where I am opening the entire side like one big door, I ensure that I am shearing the partial cut at the bottom of the B post by spreading against the rocker and a point very close to the lower hinge on the door.
This uses the structural resistance of the rocker rail and the inner construction of the door and hinge to my advantage. This also helps pull the B post out and away from the passenger.
It is easy to get overly focused on the task at hand and not take the time to really look at what the vehicle is giving us. Here are the take away points.
- Attack the gaps that give you structural or inner construction access.
- Don’t pull on the skin and expect the body to move.
- Bend the joints and connections or create joints with cuts to move components efficiently — It’s easier to move the leg if you bend the knee.
Every extrication event is different, but every passenger vehicle is fundamentally the same. Rely on the constants to overcome the variables. If we take the time to read the vehicle, we will be much more effective at accomplishing our objectives.
![]()
This content provided in partnership with FireRescue1.com


Heavy Stabilization & Lift Class
This weekend, Toranze Lee and Premier Extrication held their Heavy Stabilization and Lifting class taught. The class focused on advanced techniques using the Paratech equipment, eDraulic tools, grip hoists, vehicle stabilization methods, airbags for lifting, power tools, and the use of heavy wreckers for extrication.
")
")
")
")
")
")
")
")
")
")
")
")
")
")
")
")
Some of the departments that attended:
")
")
")
")
")
")
")
")
")
")
")
")
Building Collapse
Houston Fire Department’s Trailer 11
Check out Houston Fire Department’s new Trailer 11 purchased from Metro Fire Apparatus Specialists, Inc. It’s packed for of Paratech equipment with room for more!

Houston Fire Department’s Trailer 11
Check out Houston Fire Department’s new Trailer 11 purchased from Metro Fire Apparatus Specialists, Inc. Check out the pictures below and make sure you follow the social media pages from Metro Fire Apparatus Specialists.
Overall Pictures
Compartments Pictures
Rear Pictures


Overturned Tractor-Trailer Extrication
Check out the overturned Tractor-Trailer, confirmed entrapment, and power pole down that Elizabethtown Fire Dept Station 74 had earlier today.